Working with Semantic CorA: Unterschied zwischen den Versionen
Tabea (Diskussion | Beiträge) (Created page with "===Transcript Structure=== Each of the transcripts stored in Semantic CorA consists of a number of linked subpages, each of which bundles a single analytical or interpretive s...") |
Tabea (Diskussion | Beiträge) |
||
| Zeile 63: | Zeile 63: | ||
| − | A new window will open in which you can enter a short title, a description and a note about the new story. More detailed instructions on what information should be stored in which field can be found on the page '' | + | A new window will open in which you can enter a short title, a description and a note about the new story. More detailed instructions on what information should be stored in which field can be found on the page ''Anleitung Methodisch (Instructions Methodical)'' (in German). |
Once all fields are filled in, the story can be created by clicking on ''Save''. | Once all fields are filled in, the story can be created by clicking on ''Save''. | ||
Version vom 27. August 2019, 15:08 Uhr
Transcript Structure
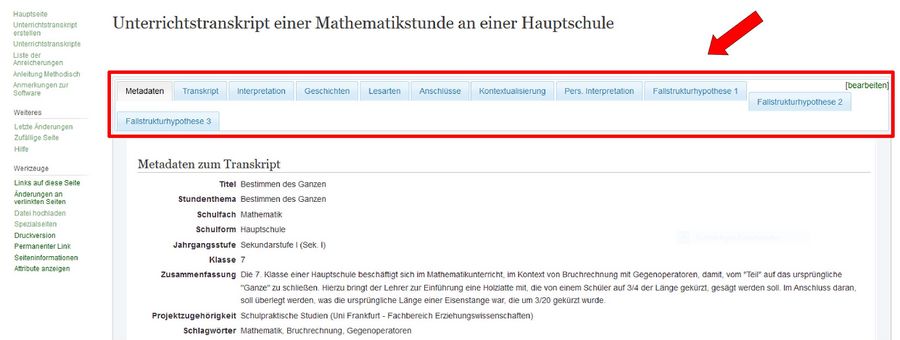
Each of the transcripts stored in Semantic CorA consists of a number of linked subpages, each of which bundles a single analytical or interpretive step. You can view and edit these pages using the tabs on the menu bar associated with each transcript.
Below you will find a brief overview of the possible processing and analytical steps that can be performed within each menu item.
Metadata
In the tab Metadata, the metadata stored for the selected transcript is displayed. Here you can find information on the transcript itself, the recording method used, and the persons appearing in the transcript.
Transcript
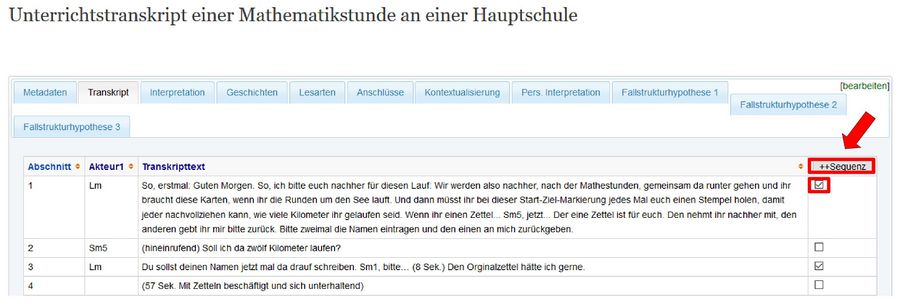
The Transcript tab allows you to view the transcribed text itself. The transcript text is divided into individual sections, which are listed sequentially below each other. For each section, the speaker is also noted as the actor. Due to its division into individual speech acts, the entire transcript appears as a tabular structure consisting of three columns: the column Section contains the numbering of the respective text block, Actor contains the name or abbreviation for the respective speaker, and the column Transcript text displays the transcribed text itself.
Sorting Text Sections
By clicking on the two yellow arrows next to each column heading, you can sort the table contents in ascending order.
Sorting is either done by section number, by actor, or by transcribed text. The latter are sorted alphabetically, whereby actors and speech acts beginning with a number or a special character are listed before entries beginning with "A". For most applications, however, it is advisable to leave the sorting numerical.
Creating Sequences
Within the tabular transcript view, the individual text sections can be divided into so-called sequences. This division is essential for the further interpretation of the transcripts, since sequences are the basic building blocks for all further analytical and interpretative work. There are two different ways to create a new sequence. A complete transcript section can be selected by clicking on the small box to the right of the transcript text and can then be "converted" into a new sequence by clicking on the ++Sequence button.
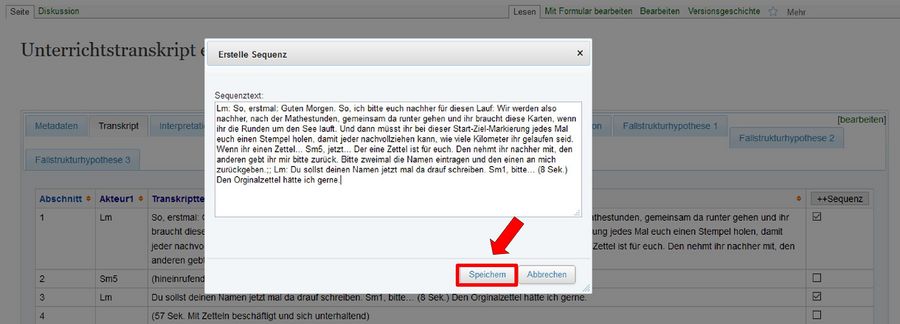
The ++Sequence button opens a smaller window in which the selected text is displayed and by clicking on Save you can save the selected sequence.
It is important to select at least one text section, otherwise the ++Sequence button will not react. You can also select several separate transcript sections and merge them into a single sequence. Alternatively, if you do not want to convert the entire text of a section, but only a smaller part of it into a sequence, you can simply mark the desired text section with the mouse. The ++Sequence field will then open automatically and the selected text section can be saved as a new sequence.
Note: All sequences created for a transcript can only be viewed via the Interpretation tab. This means that a newly saved sequence is not directly visible within the Transcript page. A newly created sequence is always only visible by clicking on the Interpretation tab.
Interpretation
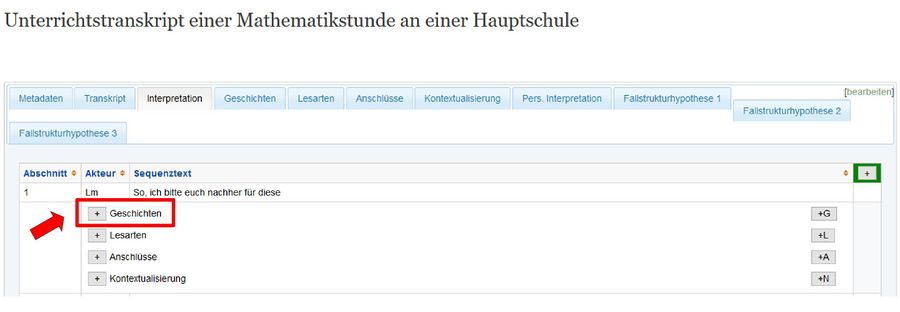
Probably the most important part of the transcription menu is the tab Interpretation. Here, also in tabular form, the previously created sequences are listed. The numbering of the sequences depends on their affiliation to the respective transcript part. Specifically, this means that all sequences, e.g. from transcript section 1, are also listed as sequences with number 1. In the Interpretation tab you can now write stories, readings, connections and contextualizations for each individual sequence. These interpretive and analytical steps can then serve as a basis for the elaboration of case structure hypotheses.
Viewing and creating stories, readings, connections and contextualizations
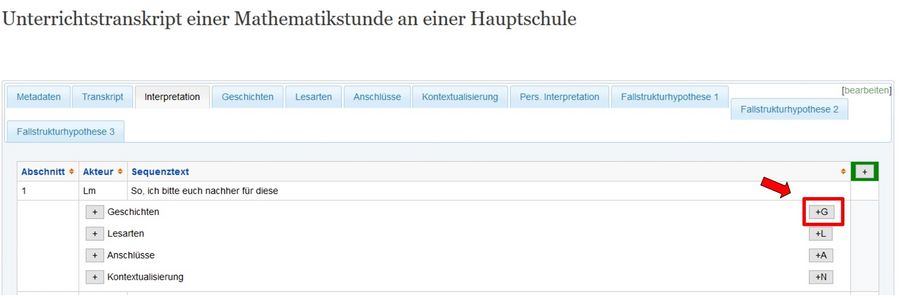
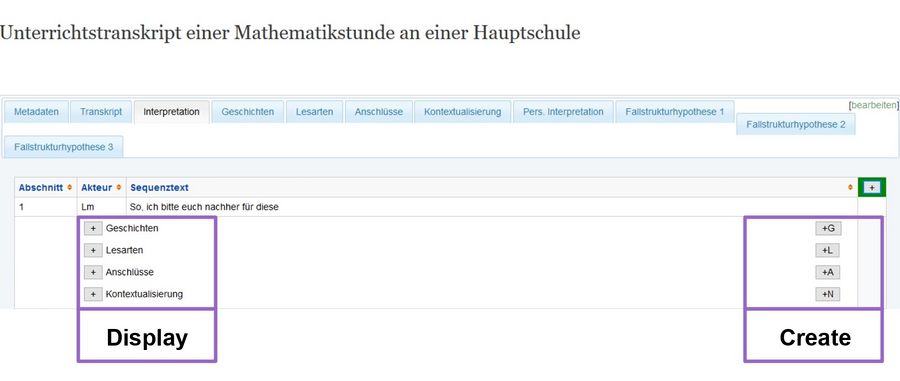
If, for example, you would like to view the stories already available for a particular sequence, you can display them by clicking on the small + button to the left of the Stories heading below the respective sequence.
Click this button again to close the opened stories. In the same way, you can show and hide all readings, connections, and contextualizations for a particular sequence.
Now, if you would like to add for example a new story to a sequence, first click on the small +G button to the right of the Stories heading below the respective sequence for which the story is to be created.
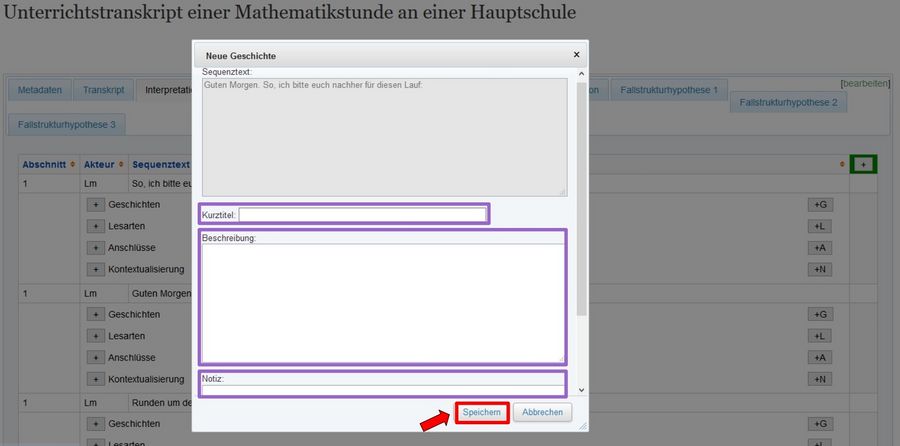
A new window will open in which you can enter a short title, a description and a note about the new story. More detailed instructions on what information should be stored in which field can be found on the page Anleitung Methodisch (Instructions Methodical) (in German).
Once all fields are filled in, the story can be created by clicking on Save.
The same process also applies to creating new readings, connections, and contextualizations.
Note: If a new story, reading, contextualization, or connection is saved, the interpretation page is automatically refreshed. This may take a moment. In order to view the newly created interpretation, you must then click on the respective + button for the corresponding sequence.
Deleting or editing interpretations
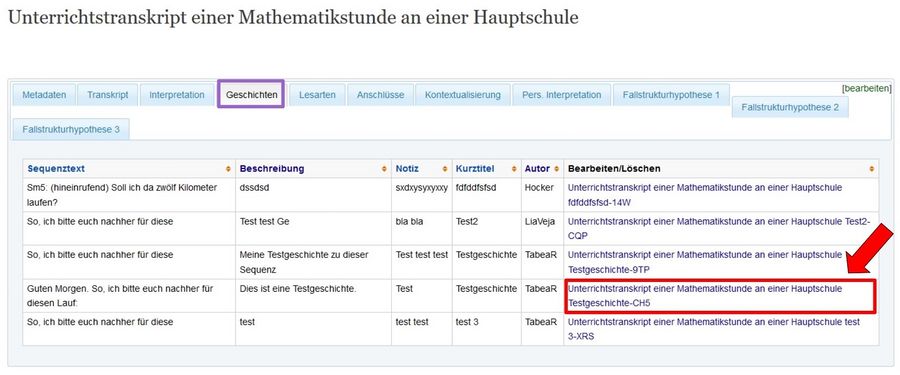
Interpretations that you have created can still be edited afterwards, or removed completely from the corresponding transcript. To edit a saved interpretation, first search for the desired interpretation via the respective tab in the transcript menu. For example, if you want to modify the description of a previously created story, first click on the Stories tab. All the stories created for the current transcript will now be displayed in tabular form. As mentioned earlier, a separate page is created in Semantic CorA for each newly created interpretation. The title of this page is shown in the rightmost column of the table. When you have found the story you want to edit, click on the page name in this column.
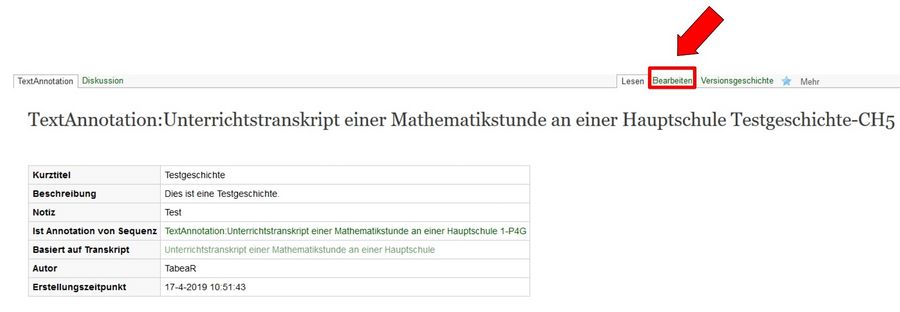
You will then be redirected to the page associated with this story. Here you will also see all the data stored for the respective interpretation, such as its short title and description. At the top right corner of the bar, click on Edit.
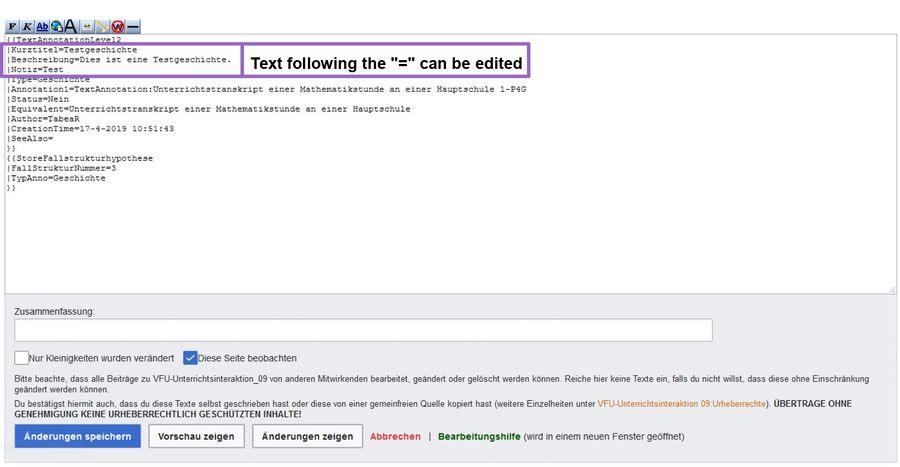
The page is refreshed and now the source code is displayed instead of the visualized interpretation. Even if this code may seem cryptic at first, the most important data fields can be easily identified: at the beginning of each new line of code they are placed after a vertical bar |.
The only fields you should change within this source code are the fields
|Kurztitel= (engl.: Short title)
|Beschreibung= (engl.: Description)
|Notiz= (engl.: Note)
You can now edit or delete the text following the equals sign of the respective data field. Please take care not to change anything else in the code, as this can lead to undesired results.
If you would like to delete an interpretation entry completely, you can simply select and delete the entire source code. The deleted interpretation will then no longer appear in the transcript overview. When you are finished, simply click on Save changes below the text field of the source code. The interpretation page will be refreshed and the changes should be visible. If you now click on the name of the corresponding transcript in the column Based on transcript, you will return to the transcript overview.
Note: If the changes made are not displayed on the transcript page, try the steps described in the section Concluding Notes.
Adding Discussion Posts
For each story, reading, contextualization, as well as for each connection discussion posts can be added. These posts can be used to describe your own interpretation approach further, or to give feedback on the interpretation contributions of others. You can create a new discussion post by clicking on the Discussion button to the right of the selected interpretation.
This will open a new window similar to the one for creating new interpretations. Here you can insert a description of the discussion and a short note. With a click on the Save button, the discussion post is then added to the selected interpretation.
An unlimited number of discussion posts can be added to each interpretation. This enables a lively exchange among the researchers.
Note: If a newly created discussion post is not saved or displayed correctly, changing the browser can often help. The Google Chrome Browser is best suited for this purpose and works most reliably with the Semantic CorA software. For further assistance, see the Concluding Notes section.
Viewing All Interpretations
In order to see not only the interpretations stored for a certain sequence, but also all the stories, readings, connections and contextualizations created for the entire transcript, you can click on the small + button at the top right of the table of sequences. The interpretations stored for each individual sequence will then be displayed.
Note: After clicking on the + button, a short delay may occur during which the interpretation contents of the entire transcript page will be loaded. Please do not click on any other buttons during this time, but wait until the contents have been completely loaded.
Filtering Interpretations
If you would like to view the contributions created for the different interpretation levels of a transcript separately, you can do so via selecting the respective tab in the transcript menu. Here, next to the Interpretation tab, all stories, readings, connections and contextualizations can be selected separately. By clicking on the tab Stories, for example, only the stories written for the respective transcript are displayed. This division makes it possible to keep an exact overview of the contributions at the various levels of interpretation. If you only want to view your own contributions, select the Pers. Interpretation tab.
Note: Contributions to discussions can only be viewed and written within the Interpretation tab. They are neither displayed in the view filtered by type of interpretation nor in the personalized view.
Case Structure Hypothesis
Based on the different interpretation levels of the respective transcript, you can create a case structure hypothesis. This hypothesis is used to connect the individual interpretation levels to each other in order to reconstruct a detailed case structure. In this way, the contradictory motivations, interests and interactions of the actors occurring in the transcript can be examined more closely. The case structure hypothesis can then be used as a basis for further research or seminar papers.
Assigning Interpretations to a Case Structure Hypothesis
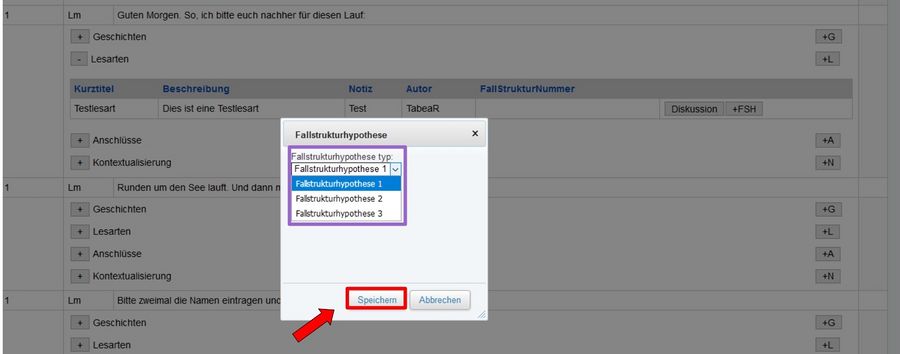
Semantic CorA can manage up to three different case structure hypotheses per transcript. Each individual case structure hypothesis can be selected via its own tab in the transcript menu. To assign stories, readings, connections, or contextualizations to a specific case structure hypothesis, click on the small +FSH button to the right of the desired interpretation in the Interpretation view.
This opens a separate window in which you can now choose to which of the three available case structure hypotheses the selected interpretation is to be added. With a click on the button Save the given interpretation will be assigned to the selected case structure hypothesis.
Note: After an interpretation has been successfully added to a case structure hypothesis, the interpretation view is refreshed. When looking at the previously selected interpretation, you will now see the number of the case structure hypothesis to which it was assigned, to the right of the author name. Thus, you can check whether the assignment was successful.
Editing a Case Structure Hypothesis
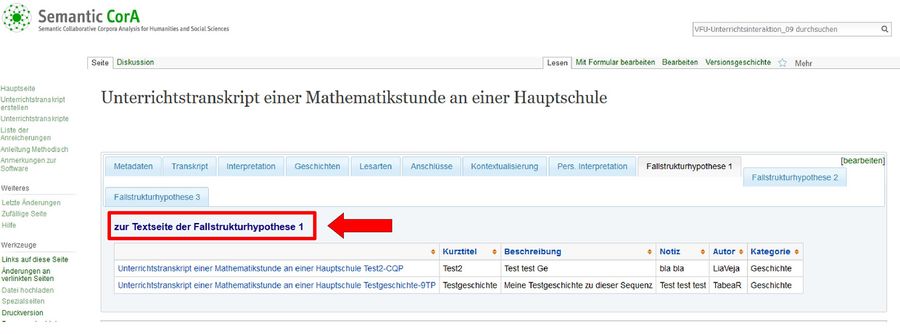
Each case structure hypothesis can be edited and annotated with additional comments. To do so, first click on the corresponding case structure hypothesis tab in the transcript menu. For example, select the tab for case structure hypothesis 1. At the top of the listed interpretations for this case structure hypothesis, click on the highlighted heading to the text page of case structure hypothesis 1. This will load the page associated with the selected case structure hypothesis.
This page consists of two parts: in the upper part you can add further comments, annotations and explanations to the case structure hypothesis. In the lower part, below the heading Linked to this case structure hypothesis, a list of the associated interpretations is provided.
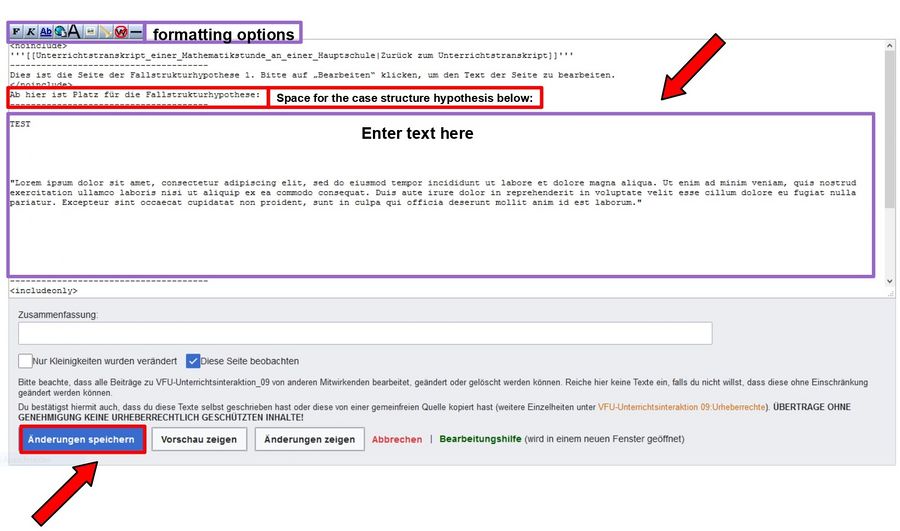
To insert a new entry, click on the Edit tab at the top of the page. This will open a text box containing the page's source code.
Below the entry Space for the case structure hypothesis below: any written comments and explanations about the case structure hypothesis can be typed in. To save the modifications you have made, click on the "Save changes" button below the text field. The page will then be refreshed and the added text passages will be displayed.
To get back to the transcript's main page, simply click on the heading Back to transcript.
Note: If you want to do some basic formatting, e.g. italicize a text section, you can easily do so using the small buttons located above the text field. Please note that no other changes or deletions to the displayed source code should be made! Any additional comments or explanations should only be inserted below this code.
Concluding Notes
In case a change you have made is not displayed immediately, no matter where it was made, you can first try to refresh the page in your browser. Alternatively, you can click on Edit in the upper right corner of the page on which the change was made. The source code of the page will then be displayed. You don't need to change anything here, just click on the 'Save changes' button at the bottom of the page. The page will refresh and all changes should now be displayed correctly.
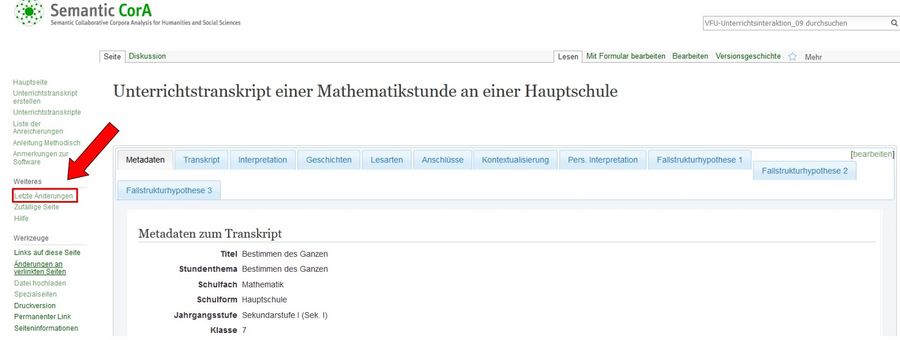
If the respective change is still not visible, you can check all pages on which changes have been made recently via the navigation bar on the left using the tab Last changes.
If the page on which the change was made is listed here, you can click on it directly and reload it. All changes should then be visible on the page. If the change you made is not listed here, the software has not saved it correctly. In this case, you can try to make the same change again and then check again to see if it has been saved.
Note: In general, the Semantic CorA software works best in combination with the Google Chrome Browser. If you encounter any problems, switching to this browser may help.

